
Building a web application opens up multiple possibilities for mind-blowing functionality and user experiences.
It also opens up opportunities for attackers to steal sensitive information.
You can use the browser as a tool to increase the security of your applications. When used effectively, the built-in protections found within the browser can ward off attacks and eliminate common flaws found in many web applications.
We’re here to equip you to use your browsers as powerful shields against attacks.
Automatic Browser Protections
We’ll begin with a review of built-in protections that the browser vendors have created. You don’t have to do anything to use these. InfoSec Institute has some great info on these protections, but we’ll touch on the big ones.
Sandbox - The major browsers (FireFox, Chrome, Edge, Safari) have spent years developing robust sandboxing features. In a sandbox, code running in the browser (i.e., JavaScript) has limited visibility into the host device. Sandboxing isn’t foolproof but is an excellent start to sound security strategy.
Malicious Site Detection - Browsers have begun to warn users when they navigate to a site that is known by the community as a malicious site. These sites could be phishing sites or sites infected with malware. Either way, the browser will automatically help the user to stay away.
Private Browsing - Privacy on the web is a massive topic, too large to get into here. But browsers like Chrome, Firefox, and Edge offer private browsing that ignores cookies and deletes browser history when closed. Private browsing was added to help keep users anonymous on the web.
Naturally, these protections are only as adequate as the latest patch or update. They give you a solid foundation and a set of features you don’t have to worry about implementing.
Now let’s get into the features you’ll have to implement in your code to get the best effect.
Browser Security Headers
Browser security headers allow developers to tell the browser which security features to use and configure them using HTTP headers returned from the server. A variety of security headers are available for use by developers. Let’s discuss the best options.
HTTP Strict Transport Security (HSTS)
HSTS allows web servers to force browsers to use TLS/HTTPS to connect to a website. If you type google.com into your browser without specifying HTTPS as the protocol, modern browsers will start the request using HTTP instead of HTTPS.
When a web server sends an HSTS header to the browser, it’s telling the browser, “Only communicate with me over a secure channel from now on.”
Previously, if the server wanted a secure connection, the flow of a request would go like this:
- The browser sends a request to the server over HTTP
- The server sends a 301 redirect code back to the browser, telling it to connect to the URL using the HTTPS protocol
- The browser sends another request to the server over HTTPS to establish a secure connection.
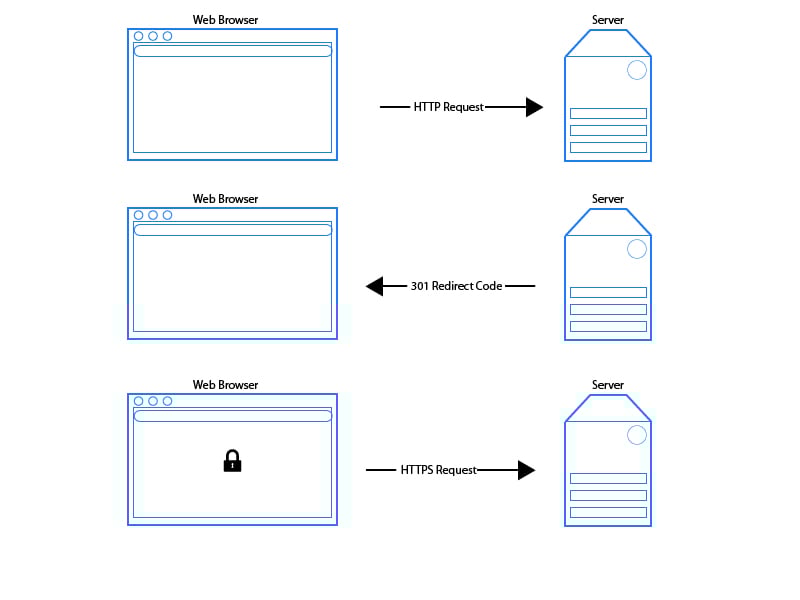
The problem with this model is that a bad guy could intercept that first request and change it in mid-flight since it was over HTTP.
When HSTS is in effect, the workflow is different. Upon seeing the HSTS header, the browser stores this domain and marks it as HTTPS only until the time listed in the header’s max-age property is over. Then the workflow works like this:
- The browser checks the URL entered to see if it’s HTTPS only
- If the request is HTTP and the site is marked as “secure only” by HSTS, the browser changes the protocol from HTTP to HTTPS before sending the request
- The browser updates the protocol to HTTPS before it sends begins the connection.
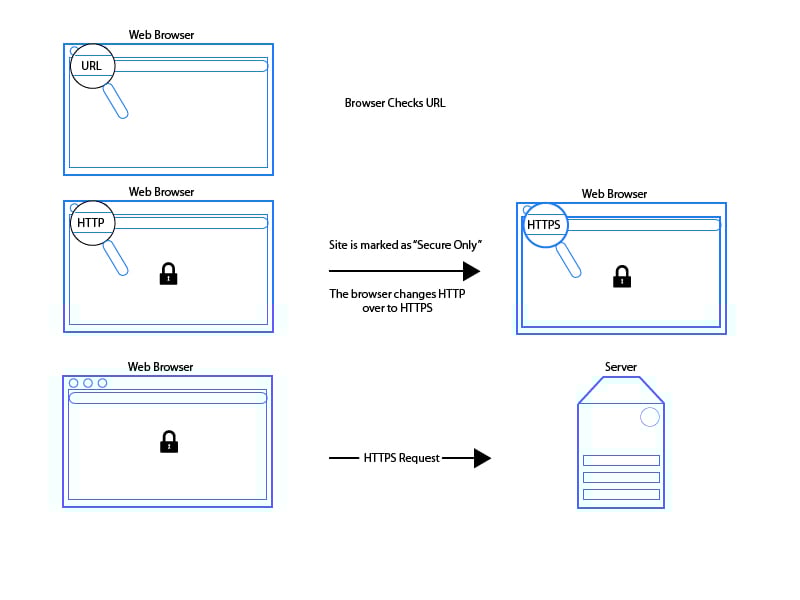
With HSTS, the browser won’t send a request and then act on a redirect. It will check internally first, then send the request after verifying if it should be secure or not.
Keep in mind that HSTS is a “trust on first visit” protocol. The first request will be with HTTP (unless the user explicitly enters “HTTPS” into the URL bar of the browser). The browser will likely be redirected to HTTPS and then the HSTS header will be received by the browser. An attacker could perform a man-in-the-middle attack during the first unsecure connection, but the benefits outweigh this risk and the window of opportunity is small.
Use HSTS on your sites. It just makes sense. Configure your server to return the strict-transport-security header with a max-age directive indicating how long the HSTS is in effect for your site. Another option, includeSubDomains, tells the browser that all subdomains should be treated as HSTS hosts. Using these values, your header will look like this:
strict-transport-security: max-age: 44356243630; includeSubDomains
Chrome and Firefox allow you to add your site to a preloaded list of secure-only sites. Doing so eliminates the need for that first HTTP request before the browser receives the HSTS header.
Content Security Policy (CSP)
Content Security Policy is a game-changing improvement to security while using JavaScript. When used wisely, CSP will eliminate most XSS and data injection vulnerabilities on your site. These attacks are used for everything from data theft to site defacement to distribution of malware. Scott Helme’s blog goes in-depth on CSP. Check out the details and options there. But here are the cliff notes you need to understand.
CSP gives you the ability to control where and how JavaScript is allowed to execute within the browser. To use it, you’ll have to configure your server to return the Content-Security-Policy header with the values you want.
For example, you can tell the browser to only run JavaScript from your domain or a list of trusted domains (i.e., Google Analytics). The browser will refuse to execute code from any other source, even after the page loads.
CSP allows you to significantly reduce the risk of drive-by injections of JavaScript via XSS vulnerabilities. You can also constrain the domains allowed to show images or videos and prevent sites from embedding yours in a frame for use in CSRF attacks.
If you’re not sure if CSP will break your site, you can use CSP in report-only mode. This mode allows for a “dry run” to see what would be blocked by CSP without actually blocking it. Then you can adjust without breaking your site for your users.
CSP has gotten a bad rap for being complicated and challenging to implement. However, there is no excuse for ignoring it. It is a mechanism built into browsers and is a part of the official HTTP spec. CSP is the future.
Plus, there are some excellent libraries, like Helmet for Node.js, that simplify adding security headers like CSP to your application. There isn’t an excuse not to use it.
Feature-Policy
Feature-Policy is a new header, introduced in 2018. It allows developers to control how their site, and embedded sites, can use certain platform features from the browser. For example, you can create a policy that disables embedded sites from using the device’s microphone or camera.
In the spirit of “least privilege” applied to browser features, you may want to restrict the use of features you know your site doesn’t need. Even more useful from a security standpoint, is the ability to prevent embedded sites from misbehaving.
Check out Scott Helme’s writeup on all of the options on the Feature-Policy header. There’s quite a bit to learn. Reduce your attack surface by removing features your application doesn’t need.
Other Security Headers
Here are some quick hitters that are easy to implement and make your site more secure.
X-Frame-Options is a well-known header used to control which domains can embed your site in an iframe. Use the value ’sameorigin’ to prevent other sites from embedding yours in an iframe.
X-Content-Type-Options has only one valid value, ‘nosniff.’ It prevents browsers from trying to guess the MIME type apart from what the server declares. Without this header, an attacker could trick a browser into executing code by cleverly naming content files.
Referrer-Policy changes the value of the referrer header depending on where the browser is directed to go. You can set your referrer header to drop URL parameters unless the request is going to the same origin. These settings keep information leakage to a minimum.
Subresource Integrity Checking
Subresource integrity allows you to check code that comes from external servers, such as a content delivery network (CDN), hasn’t been changed in transit. Using a CDN helps your site run faster, but it can expose you to risk. If an attacker can take over your CDN, they can replace your JavaScript or images and replace them with malicious code.
Subresource integrity is easy to use. Simply add a cryptographic hash to the <script> or <link> element using the integrity attribute. Once done, it’ll look like this:

The browser takes the file the CDN gives it and hashes it. If the hash it calculates doesn’t match the one you provide, then the resource is rejected.
You could run into problems if you forget to update the hash when you begin using a new version of a library or image. But the security is worth the small extra step.
Use The Browser Power
Browsers have come a long way in protecting their users. Make good use of the power afforded to you by browsers and the HTTP specification.
Taking the extra steps to set your security headers will significantly reduce your risk and make your user experience even better.
